


State management in react
An overview of state management in react and the most popular ways to handle it


What is state in react
In modern react, our application will be built with functional components. Components are themselves javascript functions, independent and reusable bits of code. The purpose of building the application with components is to have a modular architecture, with a clear separation of concerns. This makes code easier to understand, easier to maintain, and easier to reuse when possible.
The state is an object that holds information about a certain component. Plain Javascript functions don't have the ability to store information. The code within them executes and "dissapears" once the execution is finished. But thanks to state, react functional components can store information even after execution. When we need a component to store or "remember" something, or to act in a different way depending on the environment, state is what we need to make it work this way.
It's important to mention that not all components in a react app must have state. There are stateless components as well which just render its content without the need of storing any information, and that's just fine.
Another important thing to mention is that state change is one of the two things that make a react component re-render (the other is a change in props). In this way, the state stores information about the component and also controls its behavior.
UseState
In order to implement state in our components, react provides us with a hook called useState. Let's see how it works with the following example.
We'll use the classic counter example, in which we're displaying a number and we have several buttons to increase, decrease or reset that number. This is a good example of an app where we need to store a piece of information and render something different every time that information changes.
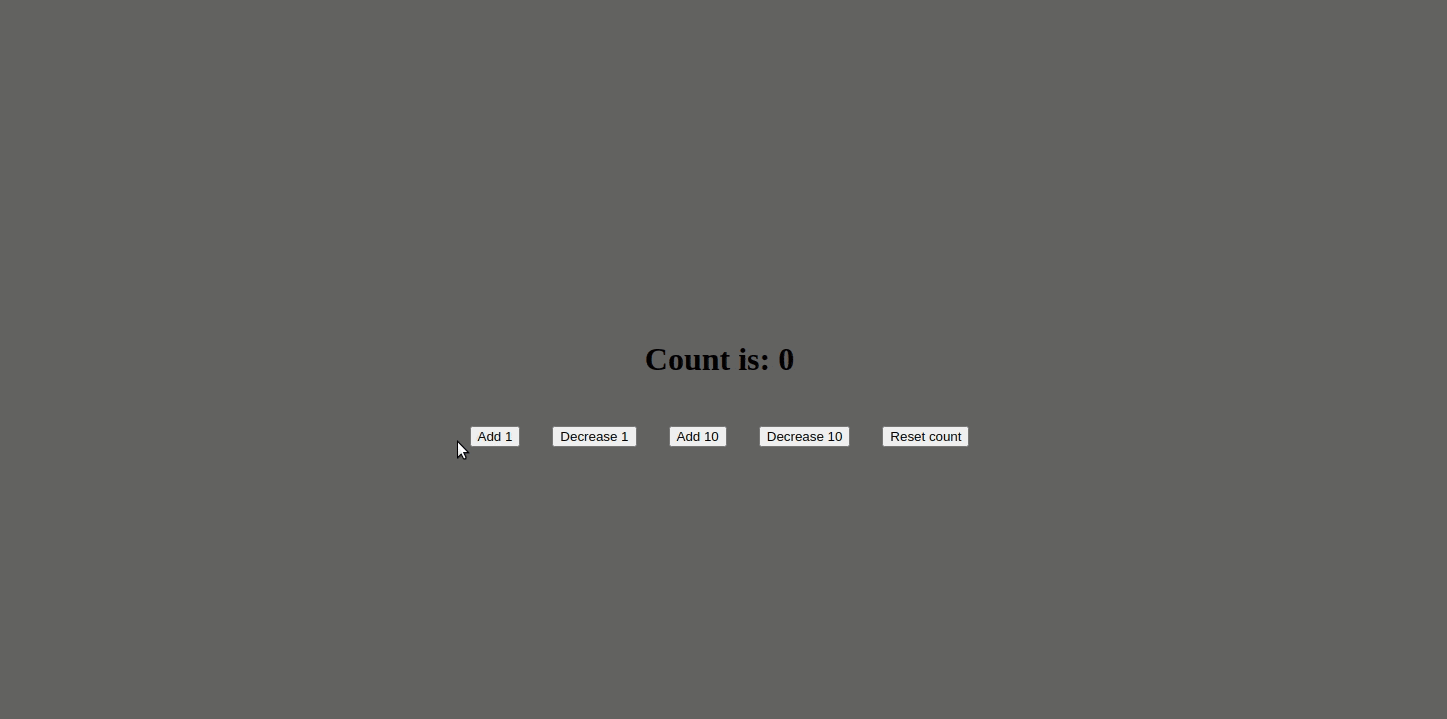
The code for this app looks like this:
import { useState } from 'react'

function App() {

  const [count, setCount] = useState(0)

  return (
    <div className="App">
      <p>Count is: {count}</p>

      <div>
        <button onClick={() => setCount(count+1)}>Add 1</button>
        <button onClick={() => setCount(count-1)}>Decrease 1</button>

        <button onClick={() => setCount(count+10)}>Add 10</button>
        <button onClick={() => setCount(count-10)}>Decrease 10</button>

        <button onClick={() => setCount(0)}>Reset count</button>
      </div>
    </div>
  )
}

export default App
First we import the hook from react:
import { useState } from 'react'Then we initialize the state:
const [count, setCount] = useState(0)
Here we provide a variable name for the state (count) and a function name we'll use every time we need to update that state (setCount). Last, we set the initial value of the state (0), which will be the value loaded by default every time the app starts.
- Lastly, as mentioned above, every time we want to update the state we have to use the function we declared:
setCountTo use it, we just need to call it passing it the new state we want as a parameter. Ie: If we want to add 1 to the previous estate, we callsetCount(count+1)
As mentioned too, this will cause an update of the state and hence the re-render of the component. Which in our app means we'll see on the screen the counter going up.
Using useEffect to read state updates
It's important to mention that the setState function is asynchronous. So if we try to read the state inmediatly afterwards updating it, like this:
<button onClick={() => {
          setCount(count+1)
          console.log(count)
}}>Add 1</button>
We would get the previous value of the state, without the update.
The correct way of reading state after the update would be using the useEffect hook, which let's us execute a function after every component re-render (by default) or after any particular variable we declare changes. Something like this:
useEffect(() => console.log(value), [value])
Passing a callback to state update function
Also, the fact that useState is asynchronous has implications when considering very frequent and quick state changes.
Take for example the case of a user that presses the ADD button many times in a row, or a loop that emits a click event a certain number of times.
By updating state like setCount(count+1) we take the risk that count won't yet be updated when the next event is fired.
For example, let's say at the start count = 0. Then setCount(count+1) is called and the state is asynchronously updated.
But then again setCount(count+1) is called, before the state update was completed, this mean that still count = 0, which means that the second setCount won't update the state correctly.
A more defensive approach would be to pass setCount a callback, like so: setCount(prevCount => prevCount+1)
This assures the value to update is the most recent one and keeps us away from the problem mentioned above. Every time we perform updates on a previous state we should use this approach.
Managing scale and complexity
So far, state management seems a piece of cake. We just need a hook, a value and a function to update it, and we're ready to go. But once apps start to get bigger and more complex, using only this may start to cause some problems.
React context
The first problem that may occur is when we have a lot of nested components, and we need many "sibling" components to share the same state. The obvious answer here is to "lift" the state up, meaning that a parent component will be the one to hold the state and it will pass it as props to the children components. This works just fine, but when we have a lot of nested components, we may need to pass props through many component levels. This is known as "prop drilling" and not only looks ugly but is also code hard to maintain.
Prop drilling can also cause unnecessary re-renders which can affect the performance of our app. If between our parent component (which stores the state) and our children components (which consume the state) there are other components ("middle components"), we will need to pass props through this components too, even if they don't need the prop. This means that these "middle components" will re-render when the prop changes, even if they have nothing different to render.
A solution to this may be to use react context, which in short is a way to create a wrapper component that wraps around any group of components we want and can pass props directly to those components, without the need to "drill" through components that wont necessarily use that state.
The thing to watch when using context, is that when the context state changes, all the wrapped components that receive that state will re-render, which might not be necessary depending the case and might cause performance issues.
So it's always important to balance whether we really need to make a state available to many components or we can just keep it local in a single component. And if we need to make it available to many components, is it really a good idea to put it in context or can we just lift it up a level. Kent C Dodds has a cool article on this topic.
UseReducer
Another problem that may come up when using useState is in occasions where the new state to be set depends on the previous state (like our count example) or when state changes occur very frequently in our application. In these occasions, useState may provoke some unexpected and unpredictable behavior. In come reducers to solve this problem.
A reducer is a pure function that takes the previous state and an action as an argument, and returns the next state. It's called a reducer because it's the same function type you could pass to an array: Array.prototype.reduce(reducer, initialValue)
useReducer is the hook reacts provides us with to implement reducers to manage our state. Using this hook, our previous example app would look like this:
import { useReducer } from 'react'
import './App.scss'

function App() {

  function reducer(state, action) {
    switch (action.type) {
      case 'ADD': return { count: state.count + 1 }
      case 'SUB': return { count: state.count - 1 }
      case 'ADD10': return { count: state.count + 10 }
      case 'SUB10': return { count: state.count - 10 }
      case 'RESET': return { count: 0 }
      default: return state
    }
  }

  const [state, dispatch] = useReducer(reducer, { count: 0 })

  return (
    <div className="App">
      <p>Count is: {state.count}</p>

      <div>
        <button onClick={() => dispatch({type: 'ADD'})}>Add 1</button>

        <button onClick={() => dispatch({type: 'SUB'})}>Decrease 1</button>

        <button onClick={() => dispatch({type: 'ADD10'})}>Add 10</button>
        <button onClick={() => dispatch({type: 'SUB10'})}>Decrease 10</button>

        <button onClick={() => dispatch({type: 'RESET'})}>Reset count</button>
      </div>
    </div>
  )
}

export default App
Again we start by importing the hook from react:
import { useReducer } from 'react'Then we'll declare a reducer function, which as parameters it will take the current state and an action to perform on it. Within it, it will have a switch statement that will read the action type, execute the corresponding action on the state and return the updated state. It's common practice to use switch statements on reducers and capital letters to declare the actions. ;)
function reducer(state, action) {
  switch (action.type) {
    case 'ADD': return { count: state.count + 1 }
    case 'SUB': return { count: state.count - 1 }
    case 'ADD10': return { count: state.count + 10 }
    case 'SUB10': return { count: state.count - 10 }
    case 'RESET': return { count: 0 }
    default: return state
  }
}
Afterwards, it's time to declare our useReducer hook, which looks fairly similar to the useState hook. We declare a value for our state ('state' in our case), a function we'll use to modify it ('dispatch'), and then useReducer will take the reducer function as first parameter and the default state as second parameter.
const [state, dispatch] = useReducer(reducer, { count: 0 })Lastly, to update our state we won't call the reducer directly, but instead we'll call the function we just created ('dispatch'), passing it the corresponding action type we want to execute. Behind the scenes, the dispatch function will connect with the reducer and actually modify the state.
<button onClick={() => dispatch({type: 'ADD'})}>Add 1</button>
It's quite a bit more boilerplate than using useState, but useReducer isn't that complex after all. To sum it up, we just need a reducer that is the function that will consolidate all possible state changes, and a dispatch function that will send the modifying actions to the reducer. The thing here is that the UI elements won't be able to update the state directly like they did before when calling setState with a value. Now they will have to call an action type and go through the reducer, which makes state management more modular and predictable. ;)
Redux
Redux is a library that has been around for a long time and is widely used in the react environment. Redux is a tool that comes to solve both of the problems mentioned before (prop drilling and unpredictable state behavior on frequent and complex state changes). It's important to mention that Redux is an agnostic library, meaning it can be implemented on any front end framework, not just react.
The Redux set of tools is very similar to what we've just seen with useReducer, but with a few more things. There are three main building blocks in Redux:
- A store — an immutable object that holds the applications state data
- A reducer — a function that returns some state data, triggered by an action type
- An action — an object that tells the reducer how to change the state. It must contain a type property, and it can contain an optional payload property
Implementing Redux, our example app would look like this:
import './App.scss'

import { Provider, useSelector, useDispatch } from 'react-redux'
import { addOne, subOne, addSome, subSome, reset } from './store/actions/count.actions'

import store from './store'

function App() {

  const dispatch = useDispatch()
  const count = useSelector(state => state.count)

  return (
    <Provider store={store}>
      <div className="App">
        <p>Count is: {count}</p>

        <div>
          <button onClick={() => dispatch(addOne())}>Add 1</button>

          <button onClick={() => dispatch(subOne())}>Decrease 1</button>

          <button onClick={() => dispatch(addSome(10))}>Add 10</button>
          <button onClick={() => dispatch(subSome(10))}>Decrease 10</button>

          <button onClick={() => dispatch(reset())}>Reset count</button>
        </div>
      </div>
    </Provider>
  )
}

export default App
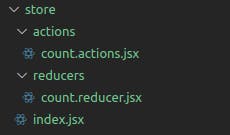
Besides, we now would need a new store directory, with its corresponding store, reducer and actions files.
// index.js (STORE)
import { createStore } from 'redux'
import CountReducer from './reducers/count.reducer'

export default createStore(CountReducer)
// count.reducer.js
import { ADD, SUB, ADDSOME, SUBSOME, RESET } from '../actions/count.actions'

const CountReducer = (state = { count: 0 }, action) => {
    switch (action.type) {
      case ADD: return { count: state.count + 1 }
      case SUB: return { count: state.count - 1 }
      case ADDSOME: return { count: state.count + action.payload }
      case SUBSOME: return { count: state.count - action.payload }
      case RESET: return { count: 0 }
      default: return state
    }
}

export default CountReducer
// count.actions.js
export const ADD = 'ADD'
export const addOne = () => ({ type: ADD })

export const SUB = 'SUB'
export const subOne = () => ({ type: SUB })

export const ADDSOME = 'ADDSOME'
export const addSome = (value) => ({
    type: ADDSOME,
    payload: value
})

export const SUBSOME = 'SUBSOME'
export const subSome = (value) => ({
    type: SUBSOME,
    payload: value
})

export const RESET = 'RESET'
export const reset = () => ({ type: RESET })
This is a lot more boilerplate that what we've seen before (that's what Redux is mainly criticized for), so lets break it in pieces:
- As I mentioned, Redux is an external library, so before anything we need to install it running
npm i redux react-redux
Redux will bring the core functions we need to manage our state and react-redux will install some cool hooks to easily read and modify state from our components.
- Now, first thing is the store. In Redux the store is the entity that stores all the app state information. Thanks to Redux, we'll be able to access the store from any component we want (just like with context).
To create a store, we import the createStore function and pass it a reducer as input. Know that you can also combine different reducers and pass it to the same store in case you'd like to separate concerns into different reducers.
import { createStore } from 'redux'
import CountReducer from './reducers/count.reducer'

export default createStore(CountReducer)
- Then there's the reducer, which works exactly the same than the one we've seen with useReducer. It takes the default state and an action as parameters, then within it it has a switch statement to read the action type, execute the corresponding state modification and return the updated state.
import { ADD, SUB, ADDSOME, SUBSOME, RESET } from '../actions/count.actions'

const CountReducer = (state = { count: 0 }, action) => {
    switch (action.type) {
      case ADD: return { count: state.count + 1 }
      case SUB: return { count: state.count - 1 }
      case ADDSOME: return { count: state.count + action.payload }
      case SUBSOME: return { count: state.count - action.payload }
      case RESET: return { count: 0 }
      default: return state
    }
}

export default CountReducer
- Then come the actions. Actions are what we're going to use to tell the reducer how to update the state. In the code you can see that for each action we're declaring constants to use them instead of plain strings (this is a good practice to improve maintainability), and functions that return either just a type or a type and a payload. This functions are what we're going to dispatch from our component in order to change the state. ;)
Note that I changed the example a bit in order to show what payload means when talking about actions. In case we want to pass a parameter from the component when we dispatch an action, payload is where that information will be. In the example, you can see that we can now pass directly from the component the number we want to add/substract when we call ADDSOME/SUBSOME.
export const ADD = 'ADD'
export const addOne = () => ({ type: ADD })

export const SUB = 'SUB'
export const subOne = () => ({ type: SUB })

export const ADDSOME = 'ADDSOME'
export const addSome = value => ({
    type: ADDSOME,
    payload: value
})

export const SUBSOME = 'SUBSOME'
export const subSome = value => ({
    type: SUBSOME,
    payload: value
})

export const RESET = 'RESET'
export const reset = () => ({ type: RESET })
- And last comes our component. Here we have 3 things to notice:
1) First we have a provider component that receives store as props. This is what grants access to our store from all the components wrapped in it.
2) Then we have a hook called useDispatch() (that we'll use to dispatch actions) and another called useSelector() (that we'll use to read the state from the store).
3) Last, notice we're dispatching the functions we declared on the actions file, and passing a value as an input when corresponds. This value is what the actions takes as payload and what the reducer is going to use to modify the state. ;)
import './App.scss'

import { useSelector, useDispatch } from 'react-redux'
import { addOne, subOne, addSome, subSome, reset } from './store/actions/count.actions'

function App() {

  const dispatch = useDispatch()
  const count = useSelector(state => state.count)

  return (
      <div className="App">
        <p>Count is: {count}</p>

        <div>
          <button onClick={() => dispatch(addOne())}>Add 1</button>

          <button onClick={() => dispatch(subOne())}>Decrease 1</button>

          <button onClick={() => dispatch(addSome(10))}>Add 10</button>
          <button onClick={() => dispatch(subSome(10))}>Decrease 10</button>

          <button onClick={() => dispatch(reset())}>Reset count</button>
        </div>
      </div>
  )
}

export default App
Redux is a nice tool that solves two problems at the same time (prop drilling and complex state changes), but it does generate a lot of boilerplate and makes state management a topic harder to get your head around, specially when dealing with different files and entities like actions, reducers, a store...
An important thing to mention here is that these tools or ways to manage state aren't mutually exclusive, they can and probably should be used at the same time, each to solve the specific problem they're good at. In the case of Redux, that problem is handling global state (meaning state that affects your whole application or a very big part of it). I wouldn't make sense to use Redux to handle a counter like our example or the opening and closing of a modal. A good golden rule is component state for component state, Redux for application state.
Alternatives
If this topic isn't yet complicated enough for you, you should know that in the last years a lot of new libraries have come up as options to Redux, each with it's own approach to state management. Just for the sake of getting a good overview, let's quickly get to know them.
Redux toolkit
Redux toolkit is a library built on top of Redux, which aims to take away some of the complexity and boilerplate that Redux generates.
Redux toolkit is built upon two things:
- A store, which works exactly the same as plain Redux store
- And slices which condensate plain Redux actions and reducers into a single thing
Implementing Redux Toolkit, our example app would look like this:
// App.js
import './App.scss'

import { useSelector, useDispatch } from 'react-redux'
import { addOne, subOne, addSome, subSome, reset } from './store/slices/count.slice'

function App() {

  const dispatch = useDispatch()
  const count = useSelector(state => state.counter.count)

  return (
      <div className="App">
        <p>Count is: {count}</p>

        <div>
          <button onClick={() => dispatch(addOne())}>Add 1</button>

          <button onClick={() => dispatch(subOne())}>Decrease 1</button>

          <button onClick={() => dispatch(addSome(10))}>Add 10</button>
          <button onClick={() => dispatch(subSome(10))}>Decrease 10</button>

          <button onClick={() => dispatch(reset())}>Reset count</button>
        </div>
      </div>
  )
}

export default App
// index.js
import React from 'react'
import ReactDOM from 'react-dom'
import App from './App'
import { Provider } from 'react-redux'
import store from './store/index'

ReactDOM.render(
  <React.StrictMode>
    <Provider store={store}>
      <App />
    </Provider>
  </React.StrictMode>,
  document.getElementById('root')
)
// Index.jsx (STORE)
import { configureStore } from '@reduxjs/toolkit'
import counterReducer from './slices/count.slice'

export const store = configureStore({
  reducer: {
      counter: counterReducer
  },
})

export default store
// count.slice.jsx
import { createSlice } from '@reduxjs/toolkit'

const initialState = { count: 0 }

export const counterSlice = createSlice({
  name: 'counter',
  initialState,
  reducers: {
    addOne: state => {state.count += 1},
    subOne: state => {state.count -= 1},
    addSome: (state, action) => {state.count += action.payload},
    subSome: (state, action) => {state.count -= action.payload},
    reset: state => {state.count = 0}
  },
})

export const { addOne, subOne, addSome, subSome, reset } = counterSlice.actions

export default counterSlice.reducer
First we need to install it by running
npm install @reduxjs/toolkit react-reduxOn our store we import the
configureStorefunction from Redux toolkit, and create the store by calling this function and passing it an object with a reducer, which itself is an object that contains a slice.
export const store = configureStore({
  reducer: {
      counter: counterReducer
  },
})
- A slice as I mentioned, is a way to condense actions and reducers into the same thing. We import the
createSlicefunction from Redux toolkit, then declare the initial state and initialize the slice.
This one will receive as parameters the name of the slice, the initial state and the functions we'll dispatch from our components in order to modify the state.
Notice there are no actions here. The UI will call the reducer functions directly. That's the complexity Redux toolkit "takes away".
export const counterSlice = createSlice({
  name: 'counter',
  initialState,
  reducers: {
    addOne: state => {state.count += 1},
    subOne: state => {state.count -= 1},
    addSome: (state, action) => {state.count += action.payload},
    subSome: (state, action) => {state.count -= action.payload},
    reset: state => {state.count = 0}
  },
})
On index.js we wrap our app around a provider component so that we can access state from anywhere.
  <Provider store={store}>
    <App />
  </Provider>
And lastly, from our component we read the state and dispatch modification functions using hooks just like with plain Redux.
function App() {

  const dispatch = useDispatch()
  const count = useSelector(state => state.counter.count)

  return (
      <div className="App">
        <p>Count is: {count}</p>

        <div>
          <button onClick={() => dispatch(addOne())}>Add 1</button>

          <button onClick={() => dispatch(subOne())}>Decrease 1</button>

          <button onClick={() => dispatch(addSome(10))}>Add 10</button>
          <button onClick={() => dispatch(subSome(10))}>Decrease 10</button>

          <button onClick={() => dispatch(reset())}>Reset count</button>
        </div>
      </div>
  )
}
Redux toolkit aims to be a simpler way to deal with Redux, but in my opinion it's still almost the same boilerplate and not much of a difference with plain Redux.
A mention for Redux Thunk and Redux Saga
Redux thunk and Redux Saga are other two popular middleware libraries that are used together with Redux.
Specifically, both Thunk and Saga are thought for using when dealing with side effects or assynchronous tasks.
Recoil

Recoil is an open source state management library specifically for react built by Facebook (or Meta, whatever...). According to their website, Recoil is built to be "minimal and reactish", in the sense that it looks and feels like plain react code.
Recoil is based upon the idea of atoms. Quoting their docs, "An atom represents a piece of state. Atoms can be read from and written to from any component. Components that read the value of an atom are implicitly subscribed to that atom, so any atom updates will result in a re-render of all components subscribed to that atom".
Using Recoil, our example app would look like this:
// App.js
import countState from './recoil/counter.atom'
import './App.scss'

import { useRecoilState } from 'recoil'

function App() {

  const [count, setCount] = useRecoilState(countState)

  return (
      <div className="App">
        <p>Count is: {count}</p>

        <div>
          <button onClick={() => setCount(count+1)}>Add 1</button>

          <button onClick={() => setCount(count-1)}>Decrease 1</button>

          <button onClick={() => setCount(count+10)}>Add 10</button>
          <button onClick={() => setCount(count-10)}>Decrease 10</button>

          <button onClick={() => setCount(0)}>Reset count</button>
        </div>
      </div>
  )
}

export default App
// index.js
import React from 'react'
import ReactDOM from 'react-dom'
import App from './App'
import { RecoilRoot } from 'recoil'

ReactDOM.render(
  <React.StrictMode>
    <RecoilRoot>
      <App />
    </RecoilRoot>
  </React.StrictMode>,
  document.getElementById('root')
)
// counter.atom.jsx
import { atom } from 'recoil'

const countState = atom({
  key: 'countState', // unique ID (with respect to other atoms/selectors)
  default: 0 // default value (aka initial value)
})

export default countState
As you can probably immediately see, this is a lot less boilerplate than Redux. =D
First we install it by running
npm install recoilComponents that use recoil state need
RecoilRootto appear somewhere in the parent tree. So we wrap our app with it.
  <React.StrictMode>
    <RecoilRoot>
      <App />
    </RecoilRoot>
  </React.StrictMode>
- Then we declare our atom, which is just an object containing a key and a default value:
const countState = atom({
  key: 'countState', // unique ID (with respect to other atoms/selectors)
  default: 0 // default value (aka initial value)
})
- Lastly, in our component we import the hook
useRecoilStateand declare our state with it, passing it the unique key we just declared in our atom.
const [count, setCount] = useRecoilState(countState)
As you can see, this looks really similar to a regular useState hook. Reactish... =P
And from our UI, we just call the setCount function to update our state.
<button onClick={() => setCount(count+1)}>Add 1</button>
Minimal, and very easy to use. Recoil is still kind of experimental and not that widely used, but you can see how devs around the world would turn for this tool.
Jotai
Jotai is an open source state management library built for react that is inspired in Recoil. It differs from Recoil in looking for an even more minimalistic API, it doesn't use string keys and It's typeScript oriented.
Same that with Recoil, Jotai uses atoms. An atom represents a piece of state. All you need is to specify an initial value, which can be primitive values like strings and numbers, objects and arrays. Then in your components you consume that atom, and on every atom change that component will re-render.
Using Jotai, our example app looks like this:
// App.js
import './App.scss'

import { useAtom } from 'jotai'

function App() {

  const [count, setCount] = useAtom(countAtom)

  return (
      <div className="App">
        <p>Count is: {count}</p>

        <div>
          <button onClick={() => setCount(count+1)}>Add 1</button>

          <button onClick={() => setCount(count-1)}>Decrease 1</button>

          <button onClick={() => setCount(count+10)}>Add 10</button>
          <button onClick={() => setCount(count-10)}>Decrease 10</button>

          <button onClick={() => setCount(0)}>Reset count</button>
        </div>
      </div>
  )
}

export default App
// counter.atom.jsx
import { atom } from 'jotai'

const countAtom = atom(0)

export default countAtom
As you can see, it's even more minimal than Recoil.
We install it running
npm install jotaiThen we declare an atom with a default value:
const countAtom = atom(0)
- And consume it with our component using
useAtom:
const [count, setCount] = useAtom(countAtom)
Really nice and simple!
Zustand
Zustand is another open source state management library built for react. It's inspired by Flux, a library widely used before Redux came around, and it aims to be "a small, fast non-opinionated and scalable bearbones state-management solution with a comfy api based on hooks and almost no boilerplate".
Zustand uses a store in a similar way that Redux does, but with the difference that in Zustand the store is now a hook, and it takes far less boilerplate.
Using Zustand, our example app would look like following:
// App.js
import './App.scss'
import useStore from './store'

function App() {

  const count = useStore(state => state.count)
  const { addOne, subOne, add10, sub10, reset } = useStore(state => state)

  return (
      <div className="App">
        <p>Count is: {count}</p>

        <div>
            <button onClick={() => addOne()}>Add 1</button>

          <button onClick={() => subOne()}>Decrease 1</button>

          <button onClick={() => add10()}>Add 10</button>
          <button onClick={() => sub10()}>Decrease 10</button>

          <button onClick={() => reset()}>Reset count</button>
        </div>
      </div>
  )
}

export default App
// Index.jsx (STORE)
import create from 'zustand'

const useStore = create(set => ({
  count: 0,
  addOne: () => set(state => ({count: state.count += 1})),
  subOne: () => set(state => ({count: state.count -= 1})),
  add10: () => set(state => ({count: state.count += 10})),
  sub10: () => set(state => ({count: state.count -= 10})),
  reset: () => set({count: 0})
}))

export default useStore
We install it running
npm install zustandWe create a store with the
createfunction we imported from Zustand. Inside we set the default state and functions we will use to modify the state.
const useStore = create(set => ({
  count: 0,
  addOne: () => set(state => ({count: state.count += 1})),
  subOne: () => set(state => ({count: state.count -= 1})),
  add10: () => set(state => ({count: state.count += 10})),
  sub10: () => set(state => ({count: state.count -= 10})),
  reset: () => set({count: 0})
}))
- Then on our component import the store we just created, and read the state and modifying functions from it in the following way:
const count = useStore(state => state.count)
const { addOne, subOne, add10, sub10, reset } = useStore(state => state)
Our UI can call the modifying functions just like this:
<button onClick={() => addOne()}>Add 1</button>
You can see how Zustand comes from the same concepts of Redux, with a much cleaner and simpler approach.
Conclussion
State management is one of the most complicated topics when it comes to front end development. And you can see how many people have tried to make it work in a predictable way, but also clean and easy to use. Specially in the last years, a lot of good tools have come up offering nice ways to deal with state management.
As developers though, we have to keep in mind that Redux and other libraries where created to solve specific state management problems, specially in really big, complex and heavy used apps.
I think that If you don't run into this problems, there's really no need to add extra boilerplate and complicate your code. Even with modern libraries that add almost no boilerplate. React itself is a very strong and solid library, and tools like useState, useReducer and useContext are quite enough to solve most problems. So I would stick to the basics unless for some reason the basics are no longer enough.
When in need of a more specific and robust state management library, I think the choice is a matter of deciding between reliability and simplicity. Redux is the most mature and used library yet, and that comes with lots of documentation, online communities, and previous bugs found and solved with each new release. The bad thing about it is as developers it presents us with some new concepts we have to learn and think about, we need to add quite some code just to make it work, and it can add more complexity than the problems that it helps to solve.
On the contrary, modern libraries like we've seen are much simpler and straight to the point, but aren't as widely used and tested, and are still kind of experimental. But for what we can see at the moment, seems just a matter of time until one or some of them take the lead and become the more widely used tool.
If my article was helpful, consider inviting me a coffee = )
